
想给博客加点花哨东西,但是笔者对前端一窍不通,是故去学TailwindCSS力(
本篇只是笔者学习TailwindCSS时的一点小笔记,汇总了一些个人觉得较为重要的概念,并不详尽。
若要系统学习Tailwind,请移步tailwindcss官网
TailwindCSS是什么?
CSS想必读者并不陌生,但有过前端开发经验的人大概率经历过被冗杂且复杂的CSS绕的头晕眼花的时刻。
暂且不论这样复杂的系统故障率有多高,光是编写HTML和CSS时的割裂体验就足够让人恼火——那么如何让网页的构建变得流畅简单?
只需书写 HTML 代码,无需书写 CSS,即可快速构建美观的网站。
这便是TailWind官网上给出的解决方案,TailWind框架通过包含如pt-4、flex、text-center等工具集,使得我们可以直接在HTML元素的class中实现我们需要的样式。
多说无益,不如亮出一段分别在有无Tailwind的情境下编写的网页代码:
<div class="abusolute w-full h-full bg-black">
    <div
    class="flex abusolute w-full h-full justify-center items-center font-mono text-5xl text-white"
    >
        ✨Hello World!
    </div>
</div><div class="background">
<div
class="greeting"
>
<div class="greeting-text">
✨Hello World!
</div>
</div>
</div>
<style>
.background{
position: abusolute;
width: 100%;
height: 100%;
background-color: rgb(0 0 0);
}
.greeting {
justify-content: center;
align-items: center;
}
.greeting-text{
font-family: "Fira code";
font-size: 2rem;
font-weight: bold;
color: white;
}
* {
margin: 0;
padding: 0;
}
</style>See the Pen HelloWorld by xiao-dreamr (@xiao-dreamr) on CodePen.
环境搭建
本文是在Valaxy框架下修改博客时写成的,故下文都将默认为Valaxy环境下
VScode 插件
推荐使用UnoCSS插件
启用插件需要当前根目录下存在unocss.config.ts文件,该文件默认配置如下即可
import {
    defineConfig,
    presetAttributify,
    presetIcons,
    presetTypography,
    presetUno,
    presetWebFonts,
    transformerDirectives,
    transformerVariantGroup
  } from 'unocss'

export default defineConfig({
    shortcuts: [
        // ...
    ],
    theme: {
        colors: {
        // ...
        }
    },
    presets: [
        presetUno(),
        presetAttributify(),
        presetIcons(),
        presetTypography(),
        presetWebFonts({
        fonts: {
            // ...
        },
        }),
    ],
    transformers: [
        transformerDirectives(),
        transformerVariantGroup(),
    ],
})
当你在配置后看到如
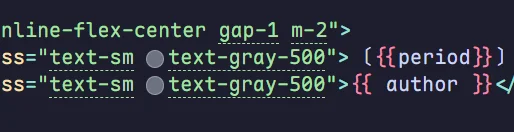
的虚线和颜色预览时,就代表配置成功
语法
预设类
UnoCss允许我们在Valaxy框架下使用TailWind CSS,并内置了同款预设。
此外,由于Valaxy内置了Attributify preset,所以我们可以不用将所有属性都挤在一个class中,而可以根据属性类别分开写,比如
<div position="absolute" bg="black" class="w-full h-full">
    <div
    flex
    position="absolute"
    class="w-full h-full justify-center items-center font-mono"
    text="5xl white"
    >
        ✨Hello World!
    </div>
</div><div class="abusolute w-full h-full bg-black">
<div
class="flex abusolute w-full h-full justify-center items-center font-mono text-5xl text-white"
>
✨Hello World!
</div>
</div>这种写法见仁见智,只要挑选自己写起来顺手舒服,可读性好的就好啦~( ̄▽ ̄)"
使用时,只需在html元素的class中添加对应预设即可
非预设情况
预设的属性并不一定能满足我们的所有需求,于是我们可以对预设进行调整。
比如我们觉得text-5xl还是太小时,我们可以通过[]将所需的数值括起来,替换5xl,就像text-[10rem],这样我们就能以TailWind的风格自定义属性
伪类/元素选择器
当我们需要编写:hover,:dark等伪类CSS时,Tailwind如何实现?
非常简单,只需在对应的属性前添加伪类名:即可,如hover:bg-blue,before:bg-pink-500。
当然,多个选择器可以相互叠加,如hover:dark:bg-sky-500。
<blockquote class="text-center text-2xl font-semibold text-gray-900 italic dark:text-white">
  When you look
  <span class="relative inline-block before:absolute before:-inset-1 before:block before:-skew-y-3 before:bg-pink-500">
    <span class="relative text-white dark:text-gray-950">annoyed</span>
  </span>
  all the time, people think that you're busy.
</blockquote>示例源tailwind.org,不过似乎在文章界面显示不了(汗)
响应式变体
当我们想在不同尺寸的设备上实现不同的显示效果时,实现的方式和伪类选择器十分相似,只需在属性前加上xxx:即可。
默认存在五种分类,根据常见的设备分辨率设置,如下:
| 前缀 | 最小宽度 |
|---|---|
sm | 40 rem |
md | 48 rem |
lg | 64 rem |
xl | 80 rem |
2xl | 96 rem |
颜色相关
我们可以通过-数字来调节颜色明暗(50~950),/数字来调节颜色不透明度(0~100),比如text-blue-300,bg-blue-500/80
常见预设
此处援引tailwindcss官网,已经相当详尽,使用时按需查阅即可,此处不再过多赘述。
Q.E.D.